

Once you have successfully navigated the online sourcing channels to procure a bag of raw green coffee seeds, you arrive at the most exciting step of the journey: How to roast coffee beans at home using the application of thermal energy.
You do not need to invest thousands of pounds in a specialised commercial drum roaster to experience the absolute alchemy of fresh coffee transformation.
In fact, you can easily crack the code of bean development using two incredibly simple household appliances that maybe already sitting in your kitchen—a heavy iron skillet or an electric hot-air popcorn popper.
To roast coffee beans at home is a profound sensory dance. It relies entirely on your ability to closely monitor shifting colour matrixes, track volatile grass-like aromas as they transform into sweet caramels, and listen for the distinct physical acoustic “cracks” of the expanding seed structures. By mastering these basic kitchen tools, you gain total creative control over your daily morning flavor profiles.
Method 1: The Kitchen Skillet (The Hand-Cranked Alchemy)
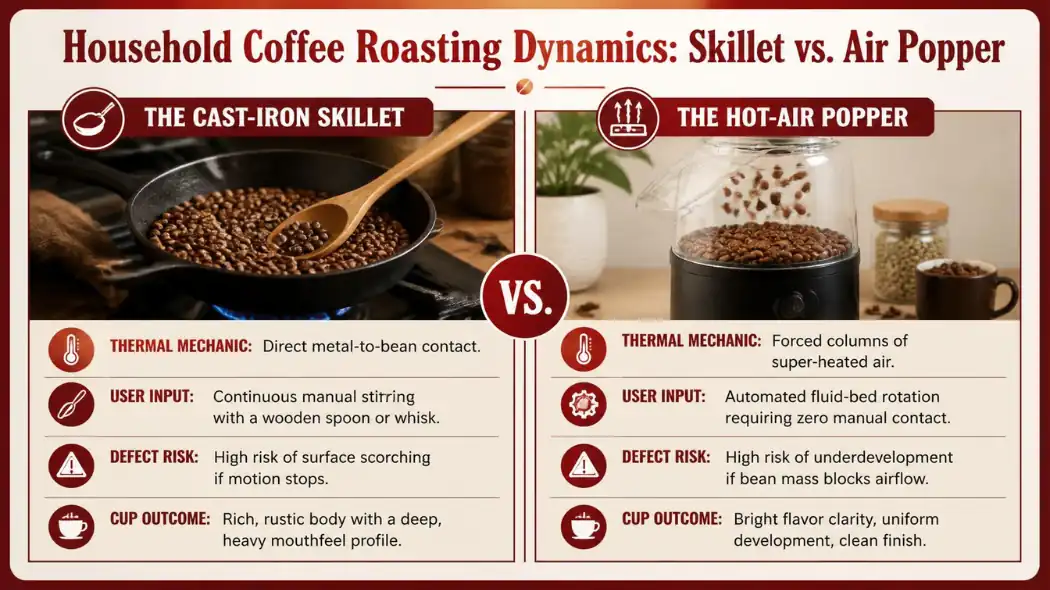
Roasting coffee beans inside a heavy skillet—ideally a seasoned cast-iron pan or a thick stainless steel skillet—is the oldest, most traditional methodology in human history, closely mimicking the open-fire cellar methods of 17th-century coffee houses. The skillet utilises direct conductive heat transfer, where the flat face of the bean absorbs energy directly from the hot metal surface.
To execute this successfully, pre-heat your skillet over a medium-high flame until it reaches roughly 200°C. Drop in a single, flat layer of green coffee beans and immediately begin stirring. The golden rule of skillet roasting is absolute, non-stop motion. You must use a wooden spoon or a whisk to keep the beans sliding across the pan continuously; if the seeds sit undisturbed for even a few seconds, the intense conductive heat will instantly scorch the flat faces, leaving your batch tasting acrid, smoky, and like burnt toast.
Method 2: The Hot-Air Popcorn Popper (The Fluid-Bed Shortcut)
If you prefer an automated setup that ensures perfect, uniform heat distribution without requiring constant manual stirring, an old-school hot-air popcorn popper (like a classic West Bend Poppery or a similar fluid-bed style machine) is the ultimate household shortcut. These devices operate on convection heat transfer, where a powerful fan forces a swirling column of intensely hot air directly up through the roasting chamber.
Simply weigh out roughly 70 to 90 grams of green beans—just enough to fill the chamber without choking the airflow—and flip the switch. The swirling air current automatically lifts, spins, and floats the beans in a continuous loop, ensuring every single seed develops at an identical velocity. Because the forced air rapidly blows away the flying chaff (the thin papery skin that sheds from the expanding bean), this method is exceptionally clean and produces a bright, highly uniform light-to-medium roast profile perfectly suited to filter methods.
The Critical Milestones: First Crack and Turning off the Heat
Whether you choose the conductive pan method or the convective air popper, the chronological stages of the roasting life-cycle remain identical. Within the first three to five minutes, the beans will turn from jade green to a pale yellow, emitting a warm, grass-like aroma as internal moisture evaporates. As the temperature inside the seed matrix reaches approximately 196°C, the trapped steam will violently rupture the cellular walls, producing an audible, distinct acoustic pop known as First Crack .
The moment First Crack finishes, you enter the critical development phase. If you pull the beans immediately, you achieve a Light Roast that preserves sparkling origin acidity and floral aromatics. If you leave them cooking for an additional two minutes, the sugars will caramelise into a balanced Medium Roast. However, be exceptionally careful: if you hear a quiet, metallic snapping sound—known as Second Crack —the cell structures are fracturing completely, forcing natural oils to the exterior and indicating you have entered a smoky, intensely bitter Dark Roast landscape.
How Kitchen Roasting Defects Corrupt Your Master Troubleshooting Balance
The biggest challenge for you to roast coffee beans at home is managing thermal precision; any sudden temperature drops or over-adjustments will induce severe structural roasting defects. Sourcing parameters verified by The Coffee Guide show that aggressive, uncontrolled stove spikes will instantly scorch or tip the ends of your beans; if your finished home-roasted cups are consistently yielding an unpleasantly mouth-drying, dry, or aggressively burnt profile, check out our master troubleshooting guide to understand why does my coffee taste bitter and learn how to adjust your parameters smoothly.
Conversely, if you get timid and allow the pan temperature to stall or drop mid-cycle, you will “bake” the coffee, drying out the cell matrix without roasting it. If your home-roasted extractions are turning out flat, dull, lifeless, and tasting like cardboard or stale cereal, explore our companion master guide to understand why does my coffee taste sour and learn how to adjust your grind sizing and water parameters cleanly.
The Immediate Post-Roast Protocol: The Colander Cool-Down
The exact moment your beans reach your target colour profile, you must stop the cooking process instantly. Coffee beans hold immense internal thermal energy; if you simply dump them into a bowl, they will continue to self-roast and scorch in their own residual heat. To execute a perfect cool-down, follow this simple two-step routine:
- The Metal Colander Transfer: Immediately dump the hot beans out of your pan or popper into a large metal kitchen colander. Avoid plastic colanders, as the intense heat can melt the synthetic material.
- The Agitation Agility: Swirl and shake the beans vigorously over an open window or sink. The ambient air passing through the mesh will drop the internal bean temperature to a safe baseline within 60 seconds, while simultaneously separating any remaining papery chaff from your finished batch. Allow the coffee to degas inside a breathable container for 24 hours before grinding!
Roasting can be a complicated task to complete to perfection
Learn about the science behind roasting of coffee beans with out next articke: Understanding Coffee Roast Profiling
