

How to Control Airflow and Heat in Tabletop Roasters
When you transition from basic household pans to dedicated home roasting equipment—such as a tabletop drum roaster or a specialised fluid-bed machine—you exit the world of guesswork and enter the realm of understanding coffee roast profiling.
In industrial coffee science, coffee roast profiling is a graphical map that plots the exact temperature of a bean mass over a timeline. Controlling this curve is the ultimate creative tool. This allows a roaster to dictate exactly how a green bean’s organic structures release their flavor potential.
You do not need to be an industrial engineer to manipulate these variables.
By understanding how thermal energy, drum speed, and airflow interact within a small-scale roaster, you can intentionally sculpt your batches.
You will learn how to maximise sweetness, mute background bitterness, or unleash dazzling fruit acidity.
The Core Variable 1: Charge Temperature and the Turning Point
The journey of coffee roast profiling begins with an event known as the Charge Temperature. This is the pre-heated ambient air temperature of your roasting drum right before you drop the room-temperature green beans inside. The moment the cool beans hit the hot metal chamber, the internal air temperature will plunge drastically on your display screen.
As the beans absorb this initial thermal energy, the temperature drop will slow down, stall completely, and begin to climb upward. This physical pivot point is called the Turning Point. Establishing a high charge temperature drops the beans into an aggressive environment that accelerates moisture evaporation, which is highly beneficial for dense, high-altitude Arabica seeds. Conversely, a lower charge temperature handles delicate, low-density varieties safely without scorching their exterior shells.
The Core Variable 2: Airflow and Convection Manipulation
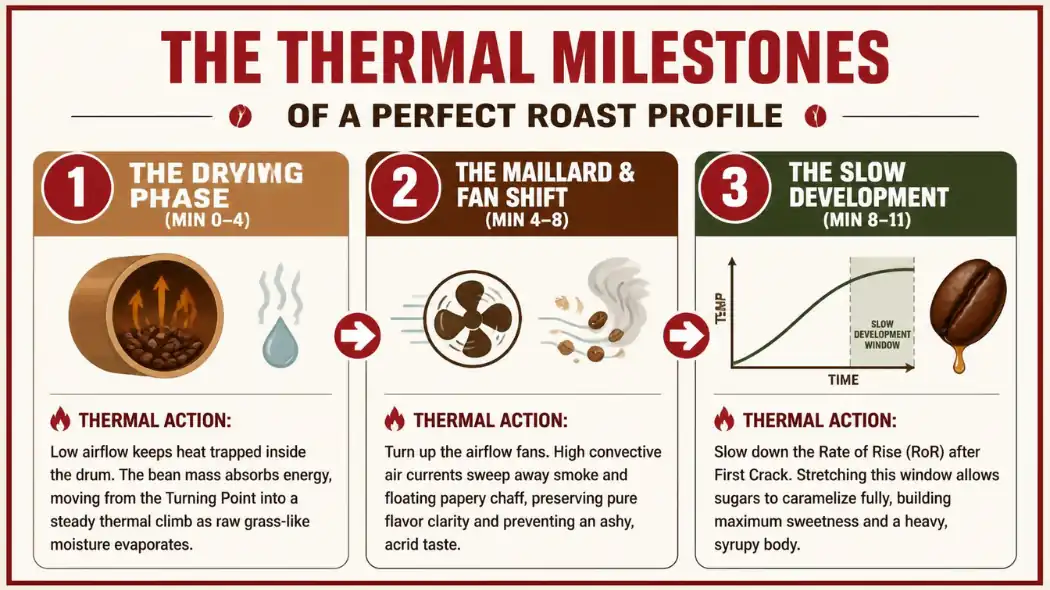
Airflow is the hidden control lever inside a tabletop roaster. Adjusting your internal fan speed alters the balance between conductive heat (the hot metal walls of the drum) and convective heat (the moving streams of hot air travelling through the chamber). Manipulating this balance at specific milestones completely re-shapes your cup’s final chemical layout:
- Early Roas Low Airflow: During the initial drying phase, you want to keep airflow minimal. This traps heat inside the drum to evaporate internal water moisture efficiently without cooling the heating elements down too early.
- Mid-Roast High Airflow: As the beans enter the Maillard reaction and begin turning brown, you must steadily increase the fan speed. High airflow rapidly sweeps away smoke and flying papery chaff. If smoke sits trapped inside the drum during this phase, it will choke the bean matrix, leaving your final cup tasting unpleasantly dull, acrid, and like dirty ash.
The Core Variable 3: Rate of Rise (RoR) and the Sugar Window
In specialty roasting taxonomy, the most critical mathematical metric to monitor is the Rate of Rise (RoR). The RoR measures exactly how many degrees the bean temperature increases per minute. The golden rule of coffee roast profiling is that your RoR should always decline smoothly over time; you want the roast to move quickly at the start and slow down steadily as it approaches completion.
Slowing down the RoR right after First Crack opens up the “sugar development window.” By extending the time the beans spend in this specific zone, you allow complex carbohydrates to break down into rich, caramelized sugars. This builds a heavy, syrupy body and deep sweetness. If you rush through this window too aggressively with a high RoR, your coffee will lack foundational sweetness and taste unpleasantly thin and flat.
How Profile Glitches Corrupt Your Master Troubleshooting Balance
Managing a tabletop roaster requires constant attention; minor profile errors will quickly induce severe structural defects. Sourcing parameters verified by The Coffee Guide show that an unmanaged, crashing RoR will stall the batch completely and bake the bean core; if your home-roasted extractions are finishing with a flat, dull, cardboard-like taste profile that lacks life, check out our master troubleshooting guide to understand why does my coffee taste sour and learn how to adjust your parameters cleanly.
Conversely, if you apply excessive heat during the development phase and allow the RoR to spike out of control, you will crash deep into Second Crack, vaporising all delicate fruit acids. If your home-roasted extractions are consistently yielding an unpleasantly mouth-drying, dry, or aggressively burnt profile, explore our companion master guide to understand why does my coffee taste bitter and learn how to adjust your grind variables and water parameters smoothly.
The Post-Roast Profiling Rule: Sifting and Logging
To turn home roasting from a game of chance into a repeatable craft, you must document your adjustments. Keep a simple roasting log tracking your charge temperatures, the exact minute your First Crack began, and your total development time. By connecting these times to how the coffee tastes inside your cup, you will quickly map out the exact blueprint required to make your favourite beans shine every single time!
