

Table of Contents
The Hario V60 Brewing method is one of the most rewarding ways to prepare filter coffee at home. It gives you considerable control over the brewing process, allowing you to adjust everything from grind size and water temperature to pouring speed and extraction time.
Unlike automatic coffee makers, the V60 relies on your technique. A few small adjustments can make a noticeable difference to the final cup, whether you’re looking for a brighter, fruitier coffee or something sweeter and more rounded.
During my coffee shop days, the V60 was one of our favourite ways to showcase delicate single-origin beans. Its straightforward design makes it look deceptively simple, but understanding how the dripper works is the key to getting the best from it.
Let’s look at the design, the brewing science and the practical techniques that will help you master this popular pour-over method.

What are the three defining design features of a Hario V60?
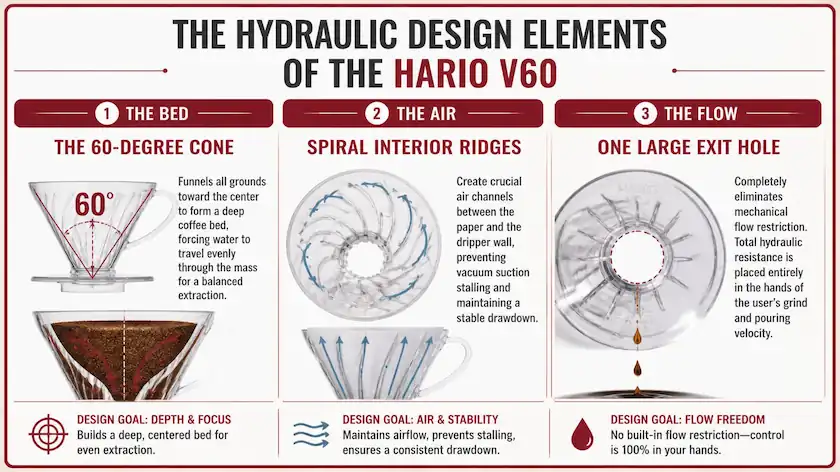
The Hario V60 takes its name from its distinctive V-shaped cone and 60-degree angle. Developed by the Japanese company Hario, the design brings together three features that give the brewer its characteristic flexibility.
| Structural feature | Design | What it does |
|---|---|---|
| 60-degree cone | A steep, conical brewing chamber | Creates a deeper bed of coffee grounds and directs water towards the central opening |
| Spiral interior ridges | Raised ribs running around the inside of the cone | Maintain space between the filter paper and dripper, helping air escape and allowing the coffee bed to expand |
| One large exit hole | A wide opening at the base | Allows water to drain without the same built-in restriction found in many multi-hole drippers |
The three features work together, but the large opening is particularly important. Rather than relying on the dripper to regulate the flow, the V60 gives the brewer greater control through grind size, pouring technique and the amount of water being added.
This is part of what makes the V60 so versatile. A faster pour and coarser grind can produce a different result from a slower pour and finer grind, even when you’re using the same coffee.
Hario explains the thinking behind these features in its own history of the V60 and its distinctive design.
Why is blooming fresh coffee grounds necessary for a Hario V60?
If you’ve ever poured water over freshly ground coffee and watched it bubble and swell, you’ve witnessed the bloom.
Freshly roasted coffee contains carbon dioxide produced during roasting. When hot water first meets the grounds, some of this gas escapes, creating the familiar bubbling effect.
Allowing the coffee to bloom before continuing with the main pour helps wet the grounds evenly and gives some of that trapped gas time to escape. This can make the subsequent extraction more consistent.
For a typical 20g dose of coffee, start with approximately 40–60g of water. The aim is to wet all the grounds without leaving dry patches.
Give the coffee around 30–45 seconds to bloom before continuing.
In my experience behind the counter, this initial stage is well worth taking your time over. Pouring the rest of the water immediately can make it harder to achieve even saturation, particularly when working with freshly roasted beans.
You don’t need an elaborate technique. A gentle, controlled pour over the entire coffee bed is usually enough. If the grounds swell and bubble, that’s perfectly normal.
One important point: blooming doesn’t guarantee a perfectly even extraction, and it won’t compensate for an unsuitable grind size or poor pouring technique. It’s simply a useful first step towards a more controlled brew.
What is the ideal water temperature and grind size for Hario V60 brewing?
Two of the most influential variables in pour-over coffee are grind size and water temperature.
The grind determines how quickly water can move through the coffee bed and how much surface area is available for extraction. Temperature influences how readily soluble compounds are extracted from the grounds.
For the V60, a medium-fine grind is a good starting point. It should be finer than the grind you’d use for a cafetière, but not as fine as espresso.
The precise setting will depend on your grinder, coffee and preferred brewing time.
Water temperature also deserves a little attention. Hario recommends approximately 92–96°C for its V60 brewing method, which is a useful starting range for many coffees.
| Roast profile | Suggested starting temperature | What to consider |
|---|---|---|
| Light roast | 94–96°C | Higher temperatures can help extract flavour from denser, lightly roasted beans |
| Medium roast | 92–94°C | A useful starting point for a balanced cup |
| Dark roast | 88–92°C | A slightly lower temperature may help produce a gentler, less intense extraction |
These are starting points rather than strict rules. A particular coffee may taste better outside these ranges, so use flavour as your guide.
If the finished brew tastes sharp, thin or underdeveloped, try a slightly finer grind or a small increase in temperature. If it tastes excessively dry, harsh or bitter, try a coarser grind or a lower temperature.
Make one adjustment at a time so you can understand what has changed.
How to brew coffee using a Hario V60: A step-by-step guide
Now that we’ve looked at the design and the variables affecting extraction, let’s put everything together.
This straightforward recipe makes a single generous cup and gives you a reliable starting point.
What you’ll need
- Hario V60 dripper and matching paper filter
- 15g freshly roasted coffee beans
- 250g (approximately 250ml) water
- Burr grinder
- Gooseneck kettle
- Digital scales
- Timer
- Mug or coffee server
Step 1: Prepare the filter
Fold the paper filter along its seam and place it inside the V60.
Rinse it thoroughly with hot water. This helps remove any papery taste and warms the dripper and serving vessel.
Discard the rinsing water before adding your coffee.
Step 2: Grind your coffee
Grind 15g of coffee to a medium-fine consistency.
Add the grounds to the filter and gently level the bed. Starting with an even surface helps you wet the coffee consistently.
Step 3: Begin the bloom
Start your timer and pour approximately 40–45g of water over the coffee, making sure all the grounds are saturated.
Allow the coffee to bloom for around 30–45 seconds.
Step 4: Continue pouring
Slowly add the remaining water in a controlled circular motion.
Try to keep the coffee bed evenly saturated, avoiding excessive pouring directly onto the filter paper.
You can divide the remaining water into two or three pours, allowing the water level to fall slightly between additions.
Step 5: Allow the coffee to drain
Once you’ve added the full 250g of water, allow the remaining liquid to pass through the coffee bed.
A total brewing time of approximately 2½–3 minutes is a useful starting point, although grind size, coffee freshness and pouring technique can all affect the drawdown.
Step 6: Taste and adjust
Give the finished coffee a gentle swirl and take a moment to appreciate the aroma before tasting.
If the cup is too sharp or thin, try grinding slightly finer next time. If it is overly bitter or dry, experiment with a coarser setting or a modest reduction in temperature.
The secret is to make small adjustments rather than changing several variables at once.
For another useful reference, Hario provides its own expert V60 brewing guide, including equipment, preparation and pouring instructions.
How do calcium and magnesium in water affect coffee flavour extraction?
Water is often overlooked when preparing filter coffee, yet it makes up the overwhelming majority of the finished drink.
Its mineral content can influence how coffee compounds are extracted, as well as how acidity and flavour are perceived.
Two minerals that receive particular attention in coffee brewing are calcium and magnesium.
Magnesium
Magnesium ions interact with various soluble compounds in coffee, including flavour-contributing acids and other aromatic compounds. The mineral balance of the water can therefore influence the character of the finished cup.
Calcium
Calcium also contributes to water hardness and can affect extraction behaviour. However, its role should not be reduced to simply producing more body or stronger base notes.
Alkalinity
Another important consideration is alkalinity, which is often associated with bicarbonate in brewing water. It helps buffer acidity, influencing how bright or muted the coffee tastes.
Too little buffering can leave acidity particularly sharp, while excessive alkalinity can flatten the brighter characteristics of some coffees.
The important point is that mineral balance matters more than simply having as much calcium or magnesium as possible.
| Water characteristic | Why it matters | What you may notice |
|---|---|---|
| Magnesium | Influences the extraction of soluble coffee compounds | Can affect flavour clarity and perceived intensity |
| Calcium | Contributes to hardness and mineral balance | Influences extraction characteristics |
| Alkalinity | Buffers acids in the brewed coffee | Affects the perception of brightness and acidity |
| Overall mineral content | Determines the general suitability of water for brewing | Can influence flavour balance and consistency |
This is one reason two people can use exactly the same coffee, grinder and V60 recipe yet produce noticeably different results. Their water may have a different mineral composition.
In my catering days, working with different tap water across venues taught me that water quality shouldn’t be treated as an afterthought. If your coffee consistently tastes flat or unbalanced despite careful brewing, the water is worth investigating.
You can explore this further in our guide to How Tap Water Quality Can Ruin Your Coffee Flavour.
Mastering the V60: The Final Verdict
Mastering the Hario V60 is really about understanding how a handful of variables work together.
The cone shape, spiral ridges and large exit hole give you the freedom to influence water flow. Your grind size, pouring technique and brewing temperature then determine how that freedom translates into the finished cup.
Blooming helps prepare the coffee bed, while suitable brewing water gives the extraction a better foundation.
You don’t need to change everything at once or follow a complicated recipe to the letter. Start with a consistent dose, a sensible water temperature and a controlled pour. Taste the result, make a small adjustment and see what happens.
In my years running a coffee shop, watching a barista gradually perfect their pour-over technique was always rewarding. The V60 makes that process particularly enjoyable because you can see how small changes affect the coffee.
And that’s the beauty of manual brewing: once you understand the basics, every cup becomes an opportunity to learn a little more.


