

Table of Contents
Steaming micro-foam milk is one of the most important skills in preparing café-quality coffee at home. Whether you are making a silky Flat White, a creamy Latte or a traditional Cappuccino, the secret lies in combining the right amount of air with controlled heat. With a little practice, a good steam wand and the correct technique, you can create glossy, finely textured milk that blends beautifully with espresso.
The aim is to produce milk with a smooth, shiny surface and tiny, evenly distributed bubbles. Baristas often describe the ideal consistency as resembling wet paint: fluid enough to pour, yet rich enough to create latte art.

What happens to milk when it is heated?
Milk steaming involves more than simply warming milk. The steam wand introduces heat and air, changing the physical structure of the liquid and creating a stable foam.
Milk contains two main groups of proteins: casein and whey. These proteins help stabilise the tiny air bubbles introduced during steaming. As the milk is heated and agitated, the proteins help form a structure around the bubbles, allowing the foam to become more uniform.
Temperature also affects the flavour and texture of the finished milk.
A useful target for home baristas is approximately 60–65°C. At this temperature, milk is pleasantly hot while retaining much of its natural sweetness and a smooth, creamy character. Heat it too far and the flavour can become cooked or unpleasant, while the foam may become less stable.
There is no single temperature at which milk suddenly becomes sweet or its proteins immediately fail. The result depends on the milk itself, its processing and the way it is heated. However, avoiding excessive heat is an important part of producing consistently good micro-foam.
How to steam and create perfect micro-foam milk
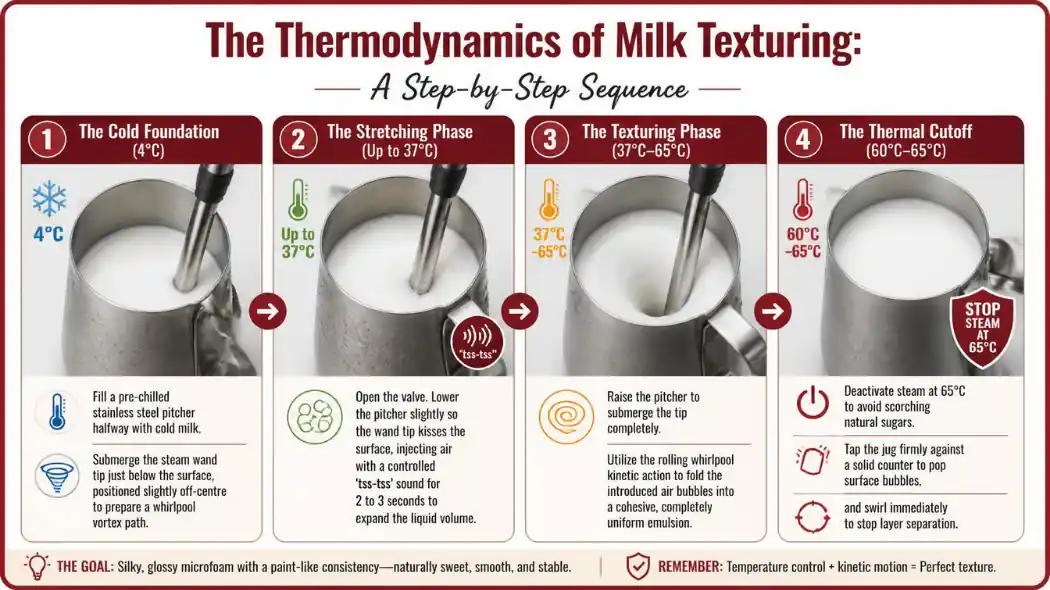
Creating good micro-foam involves five practical stages. The exact timing will vary according to your espresso machine, steam pressure, milk quantity and the drink you are preparing.
1. Prepare the milk and pitcher
Start with fresh, cold milk straight from the refrigerator. A clean stainless-steel milk pitcher is ideal because it conducts heat well and allows you to judge the temperature as you work.
Fill the pitcher to around the base of its spout, leaving enough room for the milk to expand as air is introduced. Using too much milk can make it difficult to control the texture and may cause it to overflow.
Before steaming, briefly open the steam valve to release any condensed water. Close it, then wipe the wand if necessary.
2. Position the steam wand
Place the steam wand tip just below the surface of the milk, slightly off-centre. Tilt the pitcher so that the incoming steam encourages the milk to rotate.
The aim is to establish a controlled circular movement rather than simply heating the milk in one place.
Correct positioning is important. If the wand is too close to the surface, it may introduce large bubbles and cause splashing. If it is too deeply submerged, the milk may heat without incorporating enough air.
3. The stretching phase: introduce air
Turn on the steam and lower the pitcher slightly until the tip approaches the surface.
You should hear a gentle, intermittent hissing sound as small amounts of air enter the milk. This is known as the stretching phase because the milk increases in volume as air is incorporated.
The amount of stretching depends on the drink:
- Flat White: Introduce only a small amount of air to create a thin, integrated micro-foam.
- Latte: Add slightly more air to produce a smooth, creamy texture with a light foam layer.
- Cappuccino: Introduce more air to create a noticeably thicker and more voluminous foam.
Do not rely on a fixed number of seconds. A few seconds may be sufficient for a Flat White or Latte, while a Cappuccino generally needs a longer stretching phase. Watch the milk volume and listen to the sound rather than following the clock alone.
4. The texturing phase: create a whirlpool
Once enough air has been introduced, raise the pitcher slightly so the steam wand tip is fully submerged.
The milk should begin to rotate in a smooth whirlpool. This movement breaks down and distributes the larger air pockets, incorporating them throughout the milk to create a fine, consistent texture.
Continue steaming while maintaining this rolling movement. Avoid introducing more air once the desired volume has been reached.
The finished milk should look glossy and uniform, without a separate layer of stiff foam sitting on top.
5. Finish, polish and pour
Monitor the temperature as the milk heats. Aim for approximately 60–65°C, switching off the steam before the milk becomes excessively hot.
Close the steam valve before removing the wand from the pitcher. Wipe the wand clean immediately and briefly purge it again to remove any remaining milk residue.
Tap the pitcher gently on the worktop if larger bubbles remain, then swirl the milk to restore an even, glossy consistency.
Pour promptly while the milk is still smooth and integrated. If it stands for too long, the foam can begin to separate from the liquid.

How micro-foam milk differs between popular coffee drinks
Although the basic steaming technique remains the same, the amount of air introduced determines the final milk texture. Each popular espresso-based drink has its own characteristic balance.
| Coffee drink | Milk texture | Finished result |
|---|---|---|
| Caffè Latte | Smooth, creamy micro-foam with a relatively thin foam layer | Milk-forward, velvety coffee that is easy to pour |
| Flat White | Fine, glossy and closely integrated micro-foam | Silky texture with a more pronounced espresso character |
| Cappuccino | Greater aeration and a thicker foam layer | A lighter, airier texture with a substantial foam cap |
| Cortado | Lightly textured milk with little visible foam | A balanced combination of espresso and warm milk |
| Espresso Macchiato | A small amount of textured milk or foam | Espresso marked with a modest spoonful of milk foam |
These are general characteristics rather than rigid measurements. Cup size, espresso recipe and individual café traditions can all influence the finished drink.
Troubleshooting: common milk-texturing problems
Even experienced baristas occasionally produce milk that is too bubbly, too thin or difficult to pour. Understanding the symptoms makes it easier to correct your technique.
| Visual or acoustic symptom | Possible cause | How to correct it |
|---|---|---|
| Large, visible bubbles | Too much air introduced too quickly, or the wand held too close to the surface | Submerge the tip slightly and introduce air more gently |
| Loud splashing or irregular bubbling | Wand positioning is too shallow or the pitcher angle is incorrect | Adjust the wand position and establish a smoother rolling movement |
| Thin, watery milk | Insufficient air introduced during stretching | Allow a little more air into the milk before moving into the texturing phase |
| Stiff, dry or scoopable foam | Too much air has been introduced | Shorten the stretching phase and concentrate on creating a fine whirlpool |
| Foam separating from the liquid | The milk has been left standing or has not been properly integrated | Swirl the pitcher and pour promptly after steaming |
| Cooked or unpleasant milk flavour | The milk has been overheated | Monitor the temperature and stop steaming around 60–65°C |
A useful habit is to change only one variable at a time. Adjusting the wand position, air intake and pitcher angle simultaneously makes it difficult to identify what caused the problem.
Why good milk texturing starts with good espresso
Perfectly textured milk can transform a Latte or Flat White, but it cannot disguise every problem in the espresso underneath.
If your coffee tastes harsh, dry or excessively bitter before the milk is added, the extraction may need attention. Take a look at our guide to why coffee tastes bitter and how to correct it to understand how grind size, water temperature and brewing time influence flavour.
For further guidance on the science behind milk foam, the Specialty Coffee Association’s explanation of milk micro-foam explores the role of milk proteins. You can also read Perfect Daily Grind’s practical guide to texturing milk for a closer look at steam-wand positioning and technique.
Watch: Everything You Need to Know to Steam Great Milk
For a practical demonstration, watch the video below and follow the movement of the milk as air is introduced and the whirlpool develops.
With practice, you will learn to recognise the sound of good aeration, judge the temperature and create a smooth, glossy finish. Once you can consistently produce fine micro-foam, you will be well on your way to making better Lattes, Flat Whites and Cappuccinos at home.
Happy milk foaming!


