

Table of Contents
The Moka Pot: The People’s Espresso and the Magic of Steam Pressure
What makes the Moka Pot such an enduring part of coffee culture? Few brewing devices have achieved the same combination of distinctive design, simplicity and everyday popularity.

The familiar octagonal aluminium coffee maker has become an icon of Italian domestic life. Its compact construction and pressure-driven brewing system produce a concentrated, full-bodied coffee that sits somewhere between traditional filter coffee and espresso.
Often affectionately called the people’s espresso, the Moka Pot brought an espresso-style coffee experience into ordinary kitchens, without the expense or complexity of a commercial espresso machine.
Understanding Moka Pot brewing means looking at more than simply filling the bottom chamber with water and placing it on the hob. The grind size, water temperature, heat application and timing all influence the final result.
Let’s explore the history, mechanics and practical techniques behind this remarkable little brewer.

Where Did the Moka Pot Originate?
The Moka Pot was invented by Italian engineer and designer Alfonso Bialetti, who introduced the original Moka Express in 1933.
Its distinctive octagonal aluminium design was a clever piece of domestic engineering. At a time when espresso was largely enjoyed in cafés, Bialetti created a relatively affordable way for families to prepare concentrated coffee at home.
The inspiration behind the design is often attributed to an everyday household washing device known as a lisciveuse. This was a type of laundry boiler that used heated water and a central pipe to distribute washing liquid through clothes.
According to the commonly told story, Bialetti observed this process and recognised that a similar principle could be adapted to move hot water through ground coffee.
The result was a three-part coffee maker consisting of a lower water chamber, a central filter basket and an upper collection chamber.
The Moka Express gradually became a household favourite, particularly after the Second World War, when Alfonso’s son Renato Bialetti helped expand production and promote the design.
Its familiar little moustachioed character, based on Alfonso Bialetti, became an instantly recognisable part of the brand’s identity.
Today, the original Moka Express is recognised as an important example of Italian industrial design and is included in the collection of New York’s Museum of Modern Art (MoMA).
How Does a Moka Pot Work? Understanding the Pressure Mechanics
A common misconception is that a Moka Pot produces espresso in exactly the same way as a commercial espresso machine. Although both use pressure to move hot water through ground coffee, their operating principles and pressure levels are very different.
Commercial Espresso Machines
A conventional espresso machine uses a pump to force heated water through a compacted bed of finely ground coffee.
Traditional espresso brewing commonly uses a pressure target of approximately 9 bars, although modern machines may offer different pressure profiles.
This relatively high pressure contributes to the concentrated extraction and characteristic crema associated with espresso.
The Moka Pot
A Moka Pot uses heat-generated pressure rather than a motorised pump.
As the water in the lower chamber heats, vapour pressure builds above it. This pressure pushes the hot water up through the funnel-shaped filter basket, where it passes through the coffee grounds and eventually enters the upper collection chamber.
The pressure is considerably lower than that used by a conventional espresso machine, which is why Moka Pot coffee should not technically be described as espresso.
The Three Main Components

A traditional Moka Pot consists of three main sections:
- Lower water chamber: Holds the water and contains the safety pressure valve.
- Filter basket: Holds the ground coffee and sits between the two chambers.
- Upper collection chamber: Receives the brewed coffee as it rises through the central column.
A metal filter plate and rubber or silicone gasket create the seal between the upper and lower sections. These components are important to the brewer’s operation and should be kept clean and in good condition.
How Does the Metal Filter Shape the Flavour?
Unlike a paper-filter brewing method, the Moka Pot uses a perforated metal filter basket and filter plate.
This allows more of the coffee’s natural oils and some very fine suspended particles to pass into the finished beverage.
The result is a coffee with a fuller mouthfeel and a more substantial texture than many paper-filtered brews.
Depending on the beans and roast level, the flavour may feature chocolate, toasted nuts, caramel and deeper roasted characteristics.
The metal filtration system is one reason Moka Pot coffee can feel particularly rich and satisfying, even though it is not produced at espresso pressure.
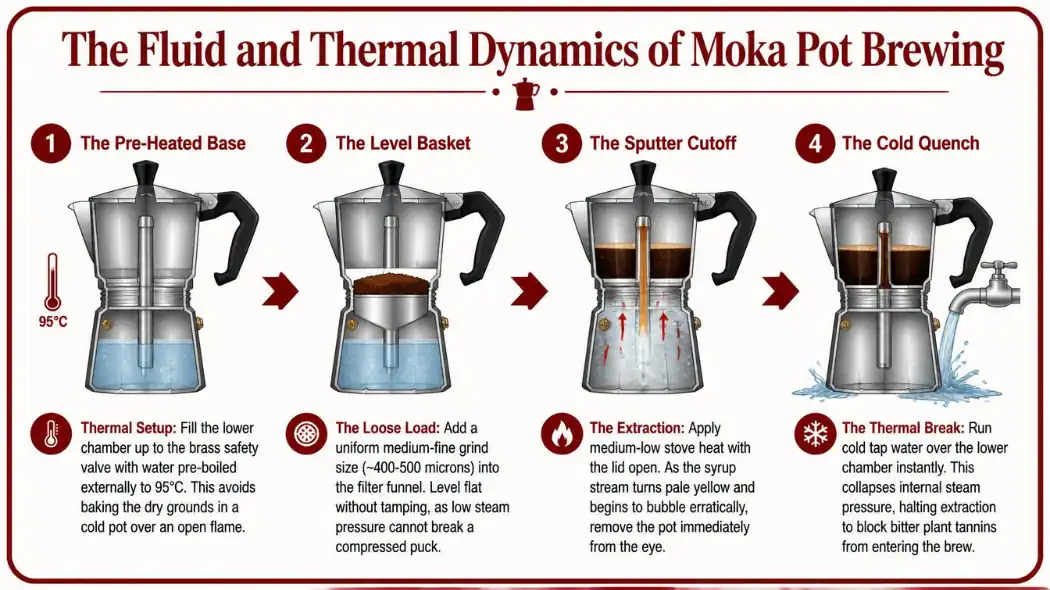
How to Brew a Balanced Cup Using a Moka Pot
A good Moka Pot brew depends on controlling the temperature and avoiding excessive heat towards the end of extraction.
The following method provides a practical starting point for a traditional stovetop brewer.
Step 1: Prepare the Water
Start by heating fresh water in a kettle.
Many home brewers prefer to use hot or recently boiled water in the lower chamber. This reduces the amount of time the coffee grounds are exposed to heat while the brewer warms up.
Carefully fill the lower chamber to just below the safety valve. Never cover the valve or fill beyond the manufacturer’s recommended level.
Because the base will become hot, use a cloth or suitable heat-resistant glove when handling it.
Step 2: Fill the Coffee Basket
Choose a medium-fine grind, generally a little coarser than a typical espresso grind.
Fill the filter basket evenly, allowing the grounds to sit loosely in place. Level the surface gently, but do not tamp or compress the coffee.
A Moka Pot is designed to operate with a loose bed of coffee. Compressing the grounds can restrict water flow and interfere with normal brewing.
Use the basket size as your guide rather than forcing in extra coffee.
Step 3: Assemble the Brewer
Carefully fit the filled filter basket into the lower chamber.
Check that the rim is clean and free from loose coffee particles, then screw the upper section onto the base securely.
Make sure the gasket is correctly seated and the two chambers are properly joined.
Step 4: Apply Moderate Heat
Place the Moka Pot on a suitable hob at a moderate or medium-low setting.
If using a gas hob, make sure the flame does not extend beyond the base of the pot. On electric or induction hobs, check that the brewer is compatible with the cooking surface. Traditional aluminium Moka Pots are not normally induction-compatible unless specifically designed with an induction base.
Leave the lid open if you wish to observe the coffee emerging, taking care to keep your hands away from hot surfaces and escaping steam.
As pressure builds, coffee will begin travelling through the central column and into the upper chamber.
Step 5: Watch the Coffee Flow
Initially, the coffee should emerge as a steady, dark stream.
As the brewing process progresses, the stream may become lighter in colour and begin to bubble or sputter. This indicates that the water in the lower chamber is becoming depleted and steam is increasingly entering the brewing path.
Remove the Moka Pot from the heat before prolonged sputtering begins.
Allow the remaining coffee to finish flowing using the residual pressure, then carefully serve.
Some brewers briefly cool the lower chamber under cold running water to slow or stop the brewing process. This is an optional technique rather than a mandatory step. If you try it, avoid splashing hot coffee or handling the pot without protection.
The important point is to stop heating before the brewer produces a prolonged, forceful sputter, which can contribute to an unpleasant, harsh finish.
How to Avoid Bitter or Over-Extracted Moka Pot Coffee
Moka Pot coffee can become harsh and bitter when the brewing process is allowed to continue for too long or when excessive heat is applied.
A few simple adjustments can make a considerable difference.
Use moderate heat: Excessively high heat can cause the coffee to emerge too quickly and encourage a more aggressive finish.
Choose the right grind: Coffee that is too fine can restrict the flow of water, while an excessively coarse grind may produce a weak or underdeveloped brew.
Avoid tamping: Compressing the grounds can interfere with water movement through the basket.
Remove the pot before prolonged sputtering: This helps prevent the final stage of brewing from becoming excessively harsh.
Stir before serving: Coffee collected in the upper chamber can vary in strength as the brew progresses. A gentle stir helps distribute the different portions more evenly.
If your finished cup is unpleasantly bitter, explore our guide to why coffee tastes bitter.
If it tastes sharply sour or underdeveloped, our companion article explains why coffee tastes sour.
Choosing the Right Coffee for Your Moka Pot
Although the Moka Pot can accommodate a wide range of coffee styles, certain characteristics work particularly well with its concentrated brewing method.
Medium Roast
Medium-roasted coffee is a useful starting point for beginners.
It often provides a balance of sweetness, acidity and body, making it versatile enough for everyday Moka Pot brewing.
Look for tasting notes such as chocolate, caramel, toasted nuts and dried fruit.
Medium-Dark Roast
Medium-dark coffees can produce a richer, more traditional Italian-style flavour.
These coffees often display deeper chocolate and roasted nut characteristics, with a fuller body and more pronounced roast flavour.
Light Roast
Light roasts can also be brewed in a Moka Pot, although they may require some experimentation.
Their higher density and generally lower solubility can make extraction more challenging. Adjusting grind size and brewing temperature may help bring out their more delicate fruit and floral characteristics.
There is no single roast level that every Moka Pot must use. Your choice ultimately comes down to the flavour you enjoy.
Cleaning and Maintaining Your Moka Pot
A well-maintained Moka Pot can provide years of reliable service.
After brewing, allow the pot to cool before dismantling it. Separate the chambers, remove the filter basket and rinse the components with warm water.
Pay particular attention to the filter plate and gasket, where coffee oils and fine particles can accumulate.
Traditional aluminium Moka Pots should generally be washed with warm water and a soft cloth rather than harsh detergents or abrasive cleaning products. Always follow the manufacturer’s care instructions for your particular model.
Periodically inspect the rubber or silicone gasket and check that the safety valve is clean and unobstructed. Replace worn seals when necessary.
Avoid leaving used coffee grounds inside the brewer for extended periods, as accumulated oils and residue can affect the taste of future brews.
The Moka Pot: A Small Design with a Lasting Legacy
The Moka Pot is a wonderful example of how a relatively simple engineering idea can transform everyday coffee culture.
Alfonso Bialetti’s 1933 design brought concentrated, espresso-style coffee into domestic kitchens and became one of Italy’s most recognisable household objects.
Its appeal lies in its simplicity. There are no complicated electronic controls, expensive pumps or elaborate brewing systems. Just water, ground coffee, heat and a little understanding of pressure.
Once you become familiar with the way your Moka Pot behaves, you can experiment with different origins, roast levels and grind settings to discover the flavour combinations you enjoy most.
It may not produce true espresso, but it offers something distinctive in its own right: a rich, concentrated coffee with a character and heritage that have stood the test of time.


