

Table of Contents
When a freshly brewed pour-over tastes disappointingly thin, weak or sharply sour, it is tempting to blame the coffee beans or the grinder. But sometimes the problem is much closer to home: the way you pour the water.
The watery pour over coffee problem is one many home brewers encounter when moving from automatic filter machines to manual brewing. A pour-over dripper gives you greater control over water temperature, flow and distribution, but that control comes with a little responsibility. The way you handle your kettle can influence how evenly the grounds become saturated and how consistently water passes through the coffee bed.
A poorly controlled pour can disturb the grounds, encourage uneven extraction or allow water to bypass the coffee altogether. The good news is that a few simple improvements to your pouring technique can make a noticeable difference.

The Hidden Enemy: Excessive Agitation and Channeling
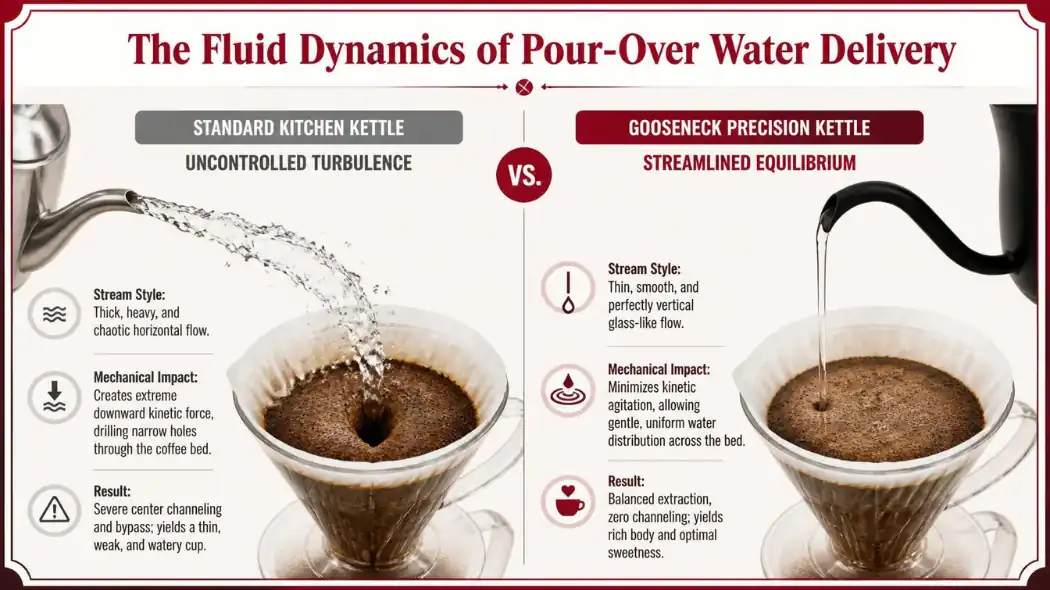
Pouring technique affects what happens inside the filter cone. A thick, fast stream from a conventional kettle can disturb the coffee bed, move fine particles around and create uneven areas through which water flows at different rates.
This is where channeling can become a problem.
Water naturally follows paths offering the least resistance. If part of the coffee bed becomes less dense or develops a channel, water may travel through that area more readily than through the surrounding grounds. Some coffee particles then receive considerably more water contact than others.
The result can be an uneven extraction: some areas contribute more bitterness and dryness, while others remain insufficiently extracted and contribute sharp or sour flavours.
It is worth remembering that channeling is not caused by every fast pour, and a gooseneck kettle cannot guarantee that it will never happen. Grind distribution, coffee-bed depth, filter shape and pouring technique all play a part.
The aim is to wet the grounds evenly and maintain a reasonably consistent coffee bed throughout brewing.
The Tool of Precision: Why a Gooseneck Kettle Helps
One of the most useful pieces of equipment for manual brewing is a specialised gooseneck kettle.

Its long, narrow, curved spout gives you greater control over the direction and rate of water delivery. Rather than releasing a large volume of water in an uncontrolled rush, you can direct a steady stream towards specific areas of the coffee bed.
This makes it easier to follow a repeatable pouring pattern, control agitation and avoid accidentally flooding the filter.
A gooseneck kettle does not automatically improve extraction or eliminate channeling. Its real advantage is precision: it helps you deliver water more consistently, making your brewing technique easier to control and repeat.
For anyone regularly preparing V60 or Chemex coffee, it is a worthwhile addition to the brewing equipment collection.
How Kettle Movements Influence Extraction Balance
Once you have a kettle that allows good control, your pouring movements become the next important consideration.
A common manual pour-over technique uses gentle concentric circles to distribute water across the coffee bed.
The Centre-to-Outer Spiral
Begin near the centre of the coffee bed and gradually work outwards in controlled circles. Avoid pouring directly onto the exposed paper filter.
This technique helps distribute water across the grounds rather than concentrating it in one small area. You can then return towards the centre as you complete the pour.
The exact pattern can vary between brewers and recipes. Some methods favour centre pouring, while others use repeated spirals. Consistency matters more than following one supposedly perfect pattern.
Avoid Pouring Directly onto the Paper Wall
Water poured onto the exposed filter paper can run down the side of the dripper without passing through the coffee bed. This is known as bypass.
A little bypass can occur in normal brewing, but excessive bypass reduces the proportion of water that actually extracts coffee. The result may be a weaker, more diluted cup.
Keep your pouring stream within the coffee bed, particularly around the outer edge. There is no need to pour against the paper wall to wet the grounds.
Control Your Pouring Height
The height of your kettle spout influences the force with which the water reaches the coffee.
Pouring from an unnecessarily great height can increase splashing and make the stream harder to control. Keeping the spout at a comfortable, consistent distance above the slurry generally helps you maintain a steadier pour.
However, pouring extremely close to the surface is not automatically ideal either. The stream’s flow rate and impact both influence agitation, so aim for a controlled, consistent technique rather than an arbitrary height.
Pouring height, stream direction and flow rate all influence the movement of water through the coffee bed.
For a more technical explanation, explore the science of water
How Pouring Mistakes Can Lead to Watery Coffee
A thin or watery cup can have several causes, and it is important not to assume that every weak brew is suffering from channeling.
Too Much Bypass
If water runs down the filter wall rather than through the grounds, it dilutes the finished brew without extracting the same amount of coffee material.
Uneven Water Distribution
If some areas of the coffee bed receive considerably more water than others, extraction can become inconsistent. This may produce a cup lacking sweetness and balance.
Excessive Agitation
Pouring too aggressively can move fine particles through the coffee bed. These fines may collect near the filter and slow the flow, sometimes producing an unexpectedly long drawdown and an unbalanced cup.
Incorrect Coffee-to-Water Ratio
This is one of the simplest explanations for watery coffee. If you use too much water for the amount of ground coffee, the finished drink may be weak even when the extraction itself is reasonably even.
If your coffee is also sharp, thin or unpleasantly sour, our guide explains why your coffee tastes sour and how to fix it.
Conversely, if excessive agitation or a stalled drawdown is producing a harsh, drying finish, explore our companion guide to why coffee tastes bitter and how to correct it.
The Professional Pour Protocol: Steady and Controlled
You don’t need complicated barista techniques to improve your next pour-over. Start with a repeatable routine and make small adjustments as you become more confident.
- Prepare your filter: Rinse the paper filter with hot water and discard the rinse water. This also warms the dripper and serving vessel.
- Level the coffee bed: Add your measured ground coffee and gently shake the dripper to distribute the grounds evenly.
- Start with the bloom: Pour enough water to saturate the grounds, commonly around twice the weight of the coffee. Allow approximately 30–45 seconds for the bloom.
- Begin your main pour: Use a steady, controlled stream, starting near the centre and moving in gentle circles towards the outer coffee bed.
- Avoid the filter wall: Keep the stream within the grounds rather than pouring directly onto exposed paper.
- Watch the water level: Avoid flooding the dripper unnecessarily. Use a consistent pouring pattern and allow the water to pass through at a steady rate.
- Taste and adjust: If the result is thin, check your coffee-to-water ratio and extraction before changing several variables at once.
A useful starting point for many filter recipes is a coffee-to-water ratio around 1:15 to 1:17. For example, 20g of coffee with 300–340g of water gives you a sensible starting range. Adjust it to suit your beans and preferred strength.
Bringing Your Pour-Over Technique Together
Pour-over brewing rewards patience and consistency. A good gooseneck kettle gives you greater control over the water, but it is your ability to distribute that water evenly that makes the real difference.
If your coffee tastes watery, start by checking your coffee-to-water ratio. Then look at your pouring pattern, water distribution and grind size. Make one adjustment at a time, and taste the result before changing anything else.
With a little practice, you will begin to recognise how the coffee bed responds to your pouring technique. That is when manual brewing becomes particularly rewarding: you are no longer simply pouring water over coffee, but learning how to guide the extraction towards a cup that is fuller, sweeter and better balanced.


